
Manchester Guitar Tech
Finishing an alder Telecaster body in metallic lacquer
Preparation
Finishing alder is much easier than painting an ash body as the wood is more tightly grained. The reduction in finishing costs is why Fender used alder bodies for their solid colours and sunbursts from the late fifties.
As with any wood however, preparation is absolutely fundamental to achieving a good result. If you skimp at any stage you will pay for it later so it’s worth while spending the time to do things right.
I’m going to be finishing this body in Ice Blue Metallic lacquer it was a toss-up between that and Charcoal Frost which I also love.
Sanding

Body as received
Most bodies you buy will be straight out of the milling machine. This means that they may well have rough edges which you need to sand.
The body I am using came, like the ash Telecaster body, from Guitarbuild.co.uk and it’s well made from 3 pieces of alder. They can supply one-piece bodies but they do cost a bit more.
I sanded well to 240 grit using a flat block for the front and back and some sandpaper wrapped around my fingers to get into the routs to clean out the loose wood.
Sanding sealer

Sanding sealer has raised the grain
The next step is to spray a couple of heavy-ish coats of sanding sealer. The first coat soaked right in as alder is a very “thirsty” wood, especially on the end grain. I don’t worry too much about finesse at this stage as I’m going to sand back anyway.
You’ll notice that the colour deepened from light brown to pale orange with the sealer applied. This is normal and the reason Fender bleached all their alder bodies before sunbursting them. I’m aiming for a metallic finish so I don’t mind if my wood has a bit of colour.
You’ll notice that the sanding sealer raises the grain so I needed to sand back again with 240 grit to give a perfectly smooth surface.
There is more information on using sanding sealer and an index coat here.
I sprayed another couple of coats of sealer and after leaving it to dry overnight, flatted back again.
I used 3/8″ and 5/16″ drills to clean any dust and sealer out of the string ferrule holes on the back of the body before spraying the primer.
Primer coats
If the sanding sealer is to give a smooth surface, then the primer coat is intended to give a bright uniform colour to accept the lacquer.

Body ready for priming
You don’t really need primer but I think it helps give a good result. Alternatively, you could use primer instead of sanding sealer as it will do a similar job but it can be a bit soft if sprayed too thickly. The fact is that if you sand the wood flat, both layers are pretty thin and do the job each is supposed to do.
Anyway, in order to spray the guitar body I need to hold it somehow. I’m using a one metre length of one inch square section mild steel tubing which I have drilled and tapped at one end to accept M4 machine screws. I can clamp this to a work surface, with the body suspended so that I can spray all around it easily. The weight of the steel tube acts as a counterbalance to the body and helps avoid accidents where the body dives to the ground. The front of the bar is held away from the neck pocket by a washer around the screw between the bar and the wood so that it doesn’t touch the edge.

Body with first coat of primer
I sprayed one coat of three passes over the whole body. After the first pass of primer, the wood grain was still showing through but after 3 passes I had an even white surface.
Once the body was an even colour I noticed one small imperfection, a small ding on the edge probably caused by handling. It can be hard to see this kind of damage when you have the wood grain camouflaging it but with an even coloured surface any blemishes stand out and now is the time to address them. I filled the ding with a tiny amount of Ronseal white 2-pack wood filler and sanded smooth. I then sprayed the repair with another coat of primer to blend it in with the rest of the body.
It was just left to block sand lightly before moving on to the colour coat.
Metallic lacquer colour coat

First pass of metallic lacquer around the edge
As will all colours, the lacquer should be sprayed in several thin coats. This is especially true of metallic lacquers, which because they are reflective, will show or even highlight every imperfection.
Spray using the same technique as shown in the butterscotch demonstration.

After one coat of metallic, primer still showing through
The photo on the left shows the first pass of colour, around the edges. you can I hope see how fine the spray is.
The photo on the right shows the body after one full coat (three passes) of lacquer and you can clearly see the primer showing through.
When spraying be sure to cover the sides of the body well as they are easy to neglect. Pay extra attention to inside the cutaway which can be difficult to reach when using this method of supporting the body. Resist the temptation to spray heavily here as runs will need sanding out. Remember to use thin coats.
By the time the third coat of lacquer is on the primer coat is completely covered and it’s time for the final “misted” coat of metallic.
Final misting coat of metallic lacquer
The final metallic coat is dusted on so that the metallic particles lie at different angles enhancing the metallic effect. If the metallic is sprayed too wet, the particles lie flat and the reflectivity is less.
The video below shows the misting technique.
Don’t handle the body at the stage as the dusty finish is quite fragile and the metal flakes will come off on your fingers leaving a mark. I sprayed some clear coats straight away (see below) to stabilise the metallic.
Clear coats
The first few coats of clear should be misted similarly so as not to wet the metallic, so causing the flakes to flatten. When spraying this body I used half a can of Clear Gloss lacquer dusted very lightly all over the guitar body until I was sure that the metallic flakes were covered and locked in place.

Clear coats sprayed
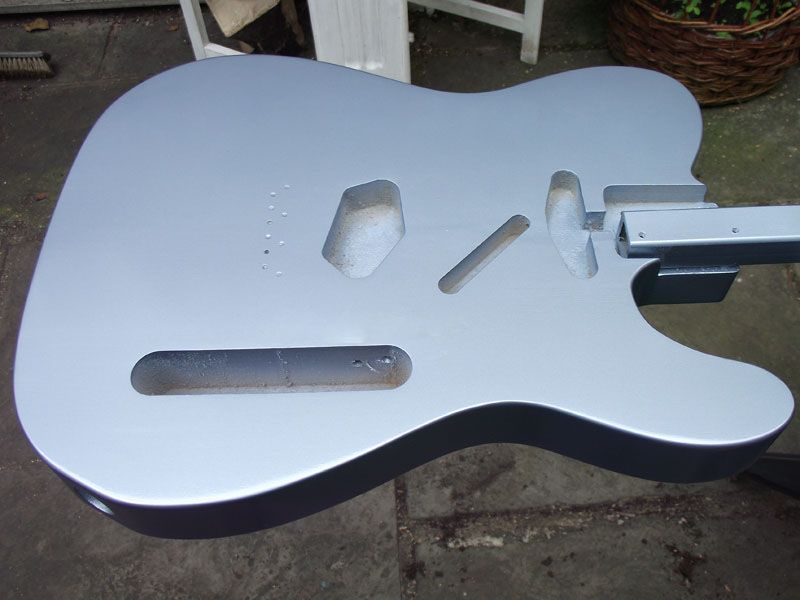
I then sprayed another whole can of Clear Gloss lacquer but wetter this time to build to a reasonable thickness of lacquer.
You can see in this photo that the body is looking quite reflective in the sunlight.

Finish straight out of the can
Well it’s dried beautifully smooth with no orange peel and there won’t be any need to flat sand this body. Must be all my painstaking prep work!
I’ll wait a couple of weeks before buffing.
Bill of Materials
I used:
- ¾ can Cellulose Sanding Sealer
- ½ can White Nitrocellulose Primer
- 1 can (almost) Ice Blue Metallic lacquer
- 1½ cans Clear Gloss lacquer
- a tack cloth
I also used 180, 240 and 320 grit 3M “Sandblaster” abrasive
I have recently bought an alder body from Guitar Build that I’m intending to spray black. I haven’t started any of my prep yet, and from what I’ve read, I probably shouldn’t be spraying anything in the UK until the weather is warmer, so the next few months are all about prep for that.
I noticed here you didn’t use any grain filler, and just went straight for the sanding sealer, whereas on your “La Cabronita” style guitar, you did use the grain filler there. Is that because it was ash?
I’m also interested to understand why you don’t tape off the neck pocket. How do you stop that causing neck set issues if the neck pocket is painted?
Temperature isn’t such a problem when spraying, but humidity is so best wait for a dry day. Low temperatures do slow drying so factor that in.
You only need grain filler on open pored woods such as ash and mahogany. Alder is fairly tight grained so pore filling is a waste of time and effort. Not to mention grain filler!
The lacquer that gets into the neck pocket isn’t thick enough to cause any alignment issues but tape it off if you wish.
Thanks for the information, that’s helpful. For a guitar body, how many cans of primer, colour and clearcoat would you tend to use? Would one of each be more than enough?
The amounts I used are above at the bottom of the article
Thanks Steve for the wealth of information you have passed on, it’s been really helpful. If it helps you or anyone else out there commencing a paint job, I used an off cut of 32mm plastic waste pipe with a length of timber inserted inside. I drilled two holes into it and screwed it to the neck pocket on the guitar. This then made it possible to clamp loosely into my bike maintenance stand, this enabled me to rotate and pitch the guitar body as I sprayed it. It made it far easier to get into the cutouts without the risk of handling and knocking the body against anything.
When I initially stripped the guitar I found it to be a plywood body, 89/90 Korean squire precision bass, I have prepped and given the body a couple of coats of grain filler and prepared it, again, I have then applied two coats sanding sealer but when I applied a coat of primer As an index coat it really showed up a few marks and pin prick holes in the curved cut out on the back of the guitar so I have used the ronseal two pack filler to repair those areas, sanded off the filler and index coat and re applied a couple of coats of sanding sealer. The primer is going back on tomorrow.
My question to you is about the final coats of lacquer. I have chosen your ocean turquoise metallic as a colour and have also bought the light tinted lacquer to obtain a colour similar to the right hand picture on your swatches. You mention using 1.5 cans of lacquer but I’m unsure whether I should have bought clear gloss lacquer as well? Will the tinted lacquer be ok on it’s own 3-4 coats or should I just do a couple of coats of tint followed a couple of clear coats of lacquer? I’m not worried if it is darker than the swatch colour.
Generally I’d recommend using the tint to get the colour right, then overspraying with lots of Clear Gloss.
This is to create a safety zone so that when (if) you flat sand and buff you don’t rub through the colour, making it paler in patches.
Just one other question, I have now primed and painted the body and applied the tint coats, should the paint finish now be slightly textured to the touch prior to the gloss lacquer going on, and if there is any dust on or in the lacquer what do I need to do before gloss lacquer goes on, just use a tac cloth?
Many thanks.
Ideally the finish should be smooth, but if not, don’t try to sand as you will thin the tint, causing paler patches. The gloss top coat should level it.
If there is dust on the surface you can wipe this off by gently brushing with a tack cloth. Don’t rub as you’ll transfer the sticky stuff to your guitar body.
If there is dust *in* the finish you can remove anything that’s proud of the surface by gentle sanding but don’t sand into the lacquer itself.
Hi..
How long can I leave metalic before another coat or lacquer…. I was thinking of hydro dipping and wondered what was the longest time I could leave my metalic base coat before it cures..? Many thanks in advance
Paul
I spray the first coats of clear immediately so that the top layer of metallic isn’t disturbed.
I have no experience at all of hydro dipping sorry!
This is a really helpful explanation of the prep and spray stages needed to achieve such an excellent metallic finish.
Thanks for the great website Steve.
I love to have this same body…Can you build another?
Thanks. Great videos. You’re a champ for sharing your knowledge. Someone at Offsetguitars.com forum recommended your site. You do fantastic work.
:)
I found this really useful, thanks.