
Manchester Guitar Tech
Spraying the neck
Before spraying I sanded the neck again, checking that everything was clean and wiped over with a tack cloth to remove any dust. I then sprayed another couple of coats of Clear Gloss lacquer to seal before moving on to the tinted coat.
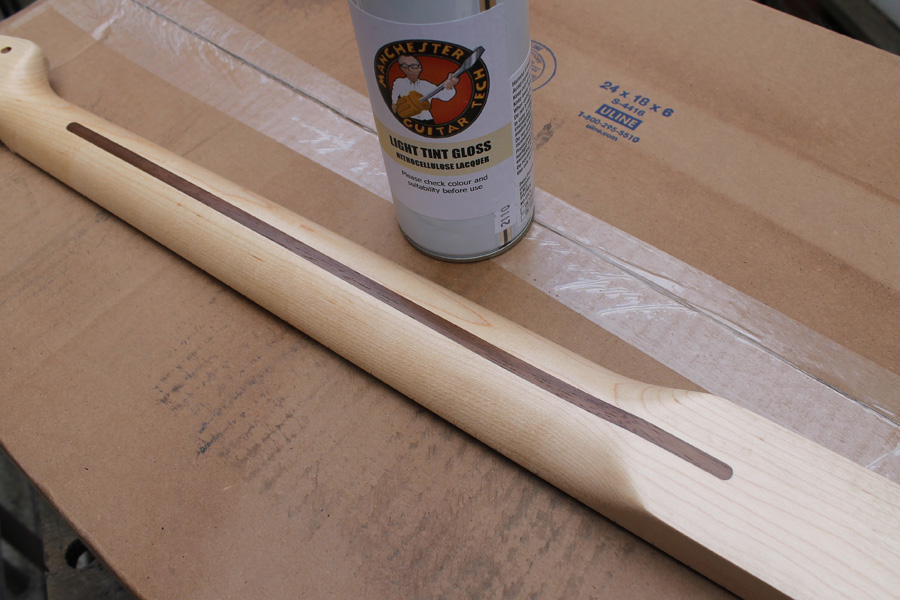 You can spray with the neck hanging vertically, but I like to spray with it in a horizontal position. I spray the headstock face, sides and fretboard then flip the neck over to spray the back. It rests on the nut and last few frets so, exercising care, this can be done while the lacquer is still wet.
I used my Light Tint Gloss lacquer as I am trying to replicate a ’69 neck which tends not to yellow very much. I’ll be spraying the headstock face a darker tint later.
The reason the for the colour difference is that in the late 60s Fender was moving towards a polyurethane finish which was cheaper to apply than nitrocellulose. Fender had also changed to using Meyercord Type C decals which were designed to be applied under the finish rather over the top as previously. Unfortunately for Fender, the decals were incompatible with the polyurethane so Fender had to retain a nitrocellulose finish on the headstock face over the decal. For this reason, although finish on the necks yellows very little, the headstock face does yellow to varying degrees as can be seen on vintage instruments from the late 60s and early 70s. Walter Trout‘s ’73 Stratocaster is an excellent example!See Vintage Guitars Collector and search for “1968 Stratocaster specs”
Once I was happy with the colour, I sprayed several coats of Clear Gloss lacquer to build up finish thickness. I didn’t sand at all between coats as it isn’t necessary unless you get sags, or dust in the lacquer. I’ll flat sand at the end before buffing.
Applying the decal
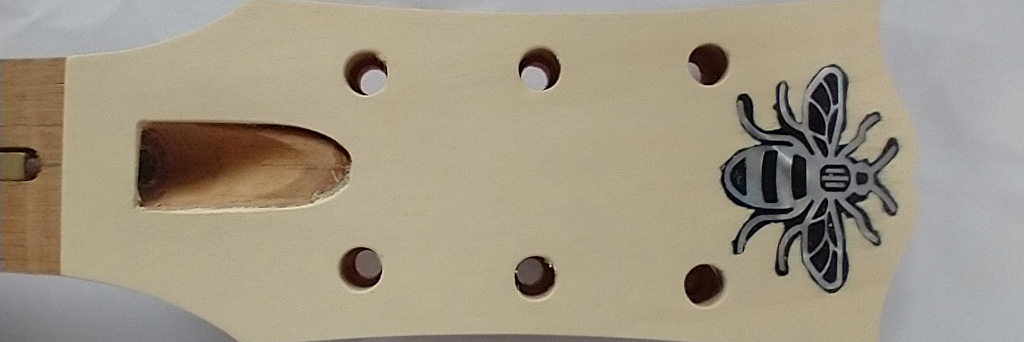
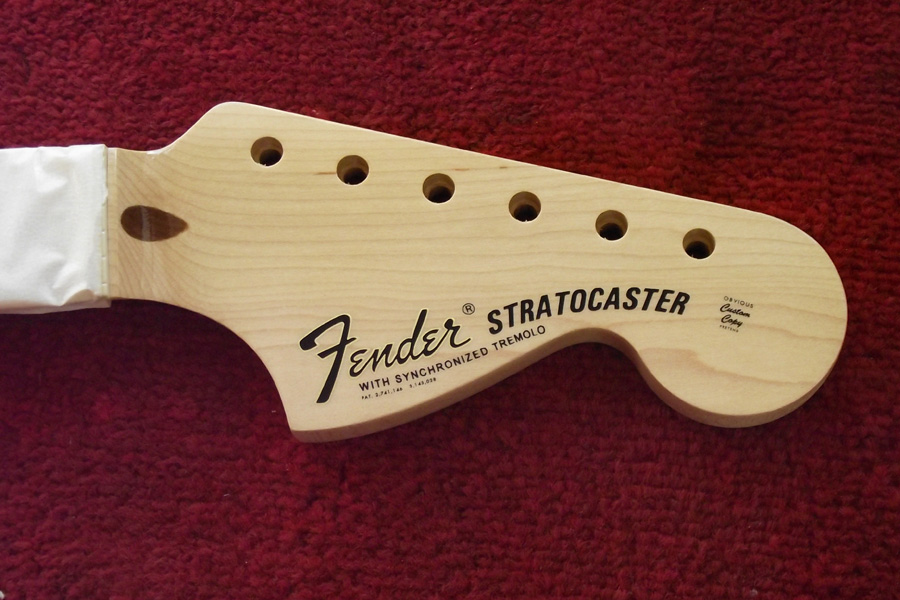
Because I’m trying to get as close to a ’69 neck as possible, I wanted my headstock logo to be spot on. Although I’m comfortable with “tribute” guitars, I don’t agree with unscrupulous people passing off replicas as the real deal. For this reason, although my logo is otherwise accurate, it contains a spoiler. On the ball end of the decal, where the Fender had the legend “Original Custom Body Patented” mine says “Obvious Custom Copy Pretend”.
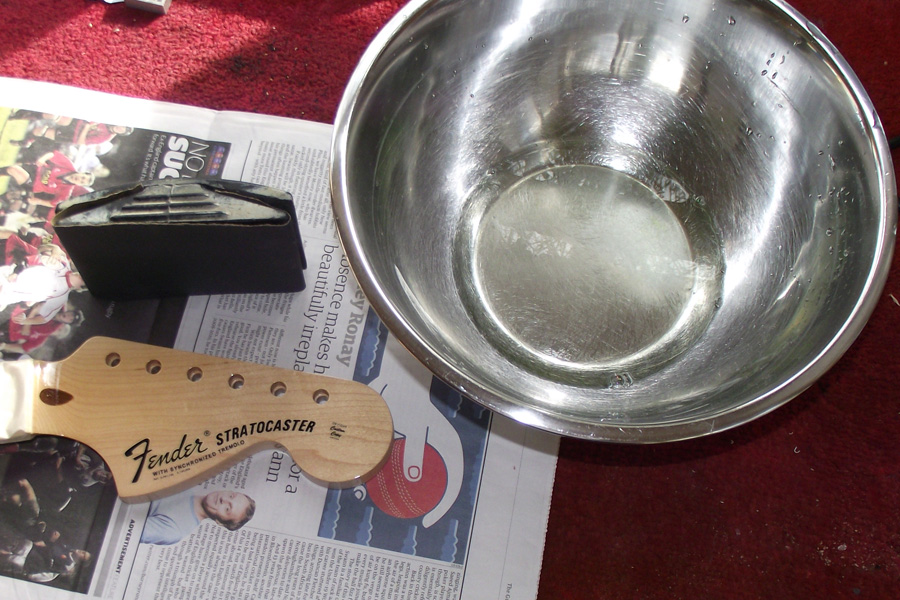
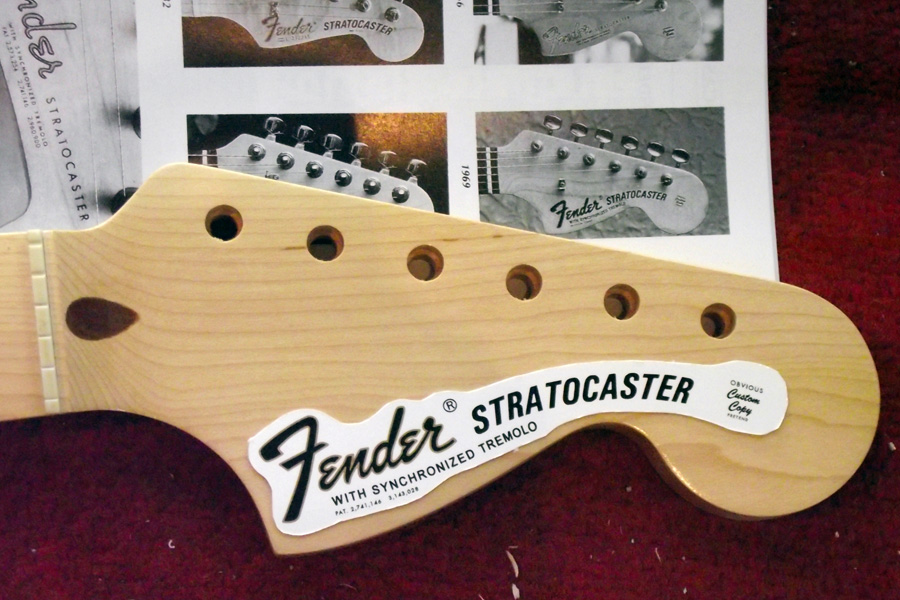 The decal was supplied (like all computer printed decals) on a rectangle of decal paper so the first job was to cut it to shape. In the picture you can see my copy of The Fender Stratocaster by A. R. Duchossoir which I used as a reference.
When applying decals I always smear some diluted (about 25% in water) white PVA glue onto the area where it’s going to be applied. I’ve found that waterslide transfers fixed like this will always stay put, even if not lacquered over.
I floated the decal off the backing paper in a bowl of luke warm water and slid it into position. Although the decal was very thin, it seemed very tough and I was able to re-position it several times until I was happy without any fear that it would break apart or stretch.
Once I thought that the decal was in the right place (referring to Duchossoir) I dabbed it into position with kitchen roll, smoothing out any wrinkles and squeezing out air bubbles. I left it overnight before lacquering.
Lacquering over the decal
Next day, I used a damp kitchen roll to remove any PVA glue residue from the headstock then the decal was ready to be oversprayed. I masked the fretboard to avoid heavy overspray on the first few frets.
Enough lacquer needs to be applied to ensure that the finish thickness is greater than that of the decal, so that it can be flatted back without sanding the printed surface.
It’s often a good idea to spray a few light coats first to avoid wetting the decal too much and after that, heavier coats are okay. When I’m doing this job I normally leave the neck outside and every half an hour or so spray another heavy-ish coat of clear lacquer. I check for dust between coats and wipe with a tack cloth if necessary to minimise any contamination. I think I applied about ten heavy (quite wet) coats in total until I was happy that the lacquer was thick enough.
I then left it for a week for the lacquer to harden and shrink back before the next step.
Yellowing the headstock face
Before the tinted lacquer is sprayed, the headstock face should be levelled as there will be a raised area where the decal adds thickness.
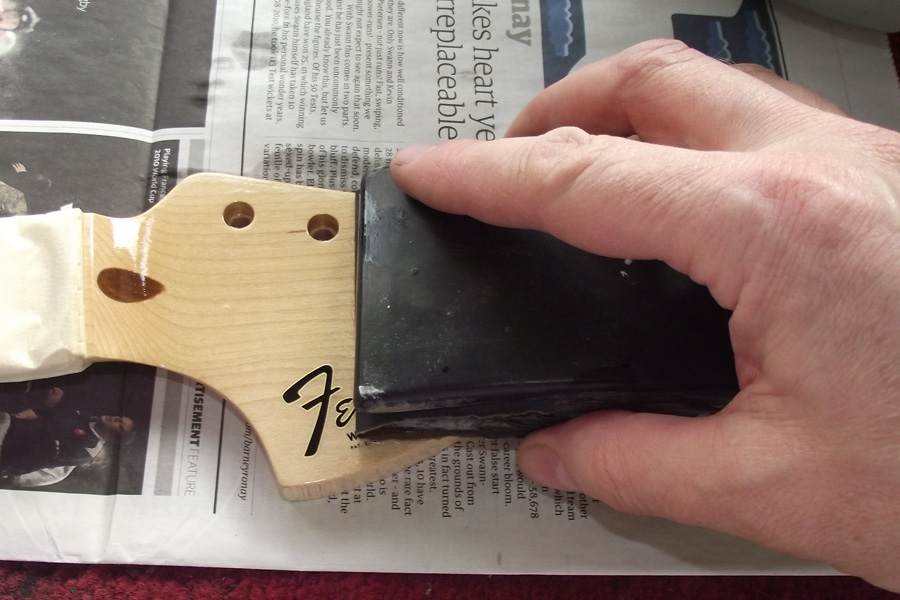
I block sanded with P400 wet or dry paper, using some water as lubricant. The water has a little washing-up liquid added to help avoid clogging the paper.
I took care not to get water in the tuner holes as this can cause the wood to swell. Any water that did get in the holes was taken out quickly with kitchen roll.
Use a sanding block, P400 paper and water with a bit of washing up liquid in it
Flat sanding the headstock
I sanded carefully until no shiny spots were left, so I knew that the headstock was completely flat. You can see in the next picture the halfway point where the high spots have been flatted but the low spots as yet untouched.
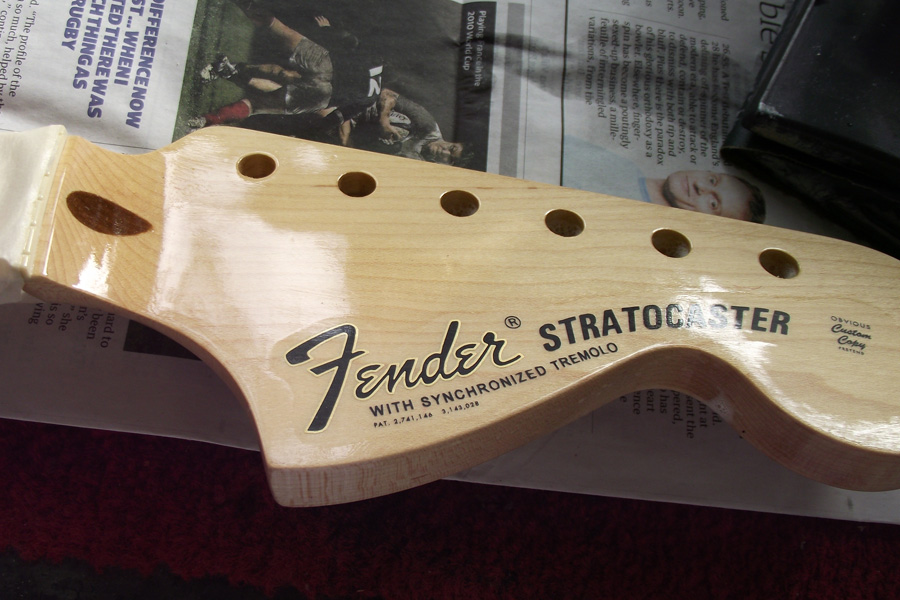
Sand until no shiny low spots are left
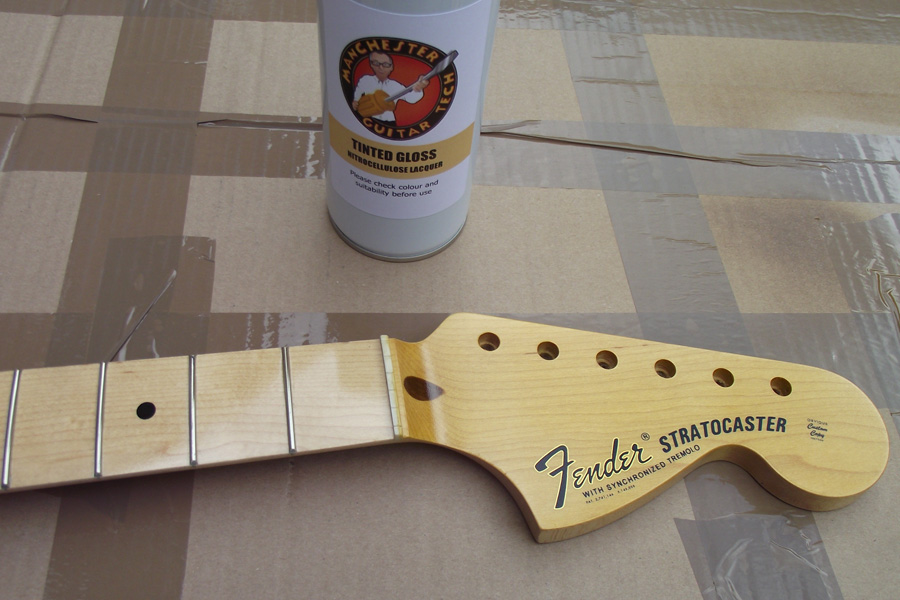
Once the headstock face is flat the tinted lacquer can be sprayed. I gave it a few light coats of my Tinted Gloss lacquer. You can see the contrast with the much lighter fretboard. I didn’t worry about getting overspray on the edges of the headstock as this is all historically accurate!
You can spray as much tint as you like (cf Walter Trout’s guitar) but I didn’t want to over do it so went for a medium yellowing.
The yellowed headstock face
The next job is to give the headstock a few more coats of Clear Gloss lacquer, then leaving another week before final flat sand and buffing.
Before the final polish however it will be time to dress the frets. To be continued…!
That’s great, thanks for the quick reply. I assume I would bury any decal under the clear coat sealer layer if I put one on? ….I found someone selling decals btw but these said they’re unsuitable for nitro, any ideas how this could be got round , or can you recommend decals that are ok with the nitro ( I assume the clear coat is also nitro? )
Yes you can bury under clearcoat as I do above. This is pretty much essential for computer printed waterslide transfers. Old school silk-screened transfers generally go on top of the lacquer.
I’ve never found a transfer that can’t spray nitrocellulose over the top of but you do need to (i) fix it well – see above and (ii) spray dry-ish coats first so as not to wet it too much. Some transfers though (which I haven’t used) are poor quality so caveat emptor!
All my lacquers (apart from the Gold Top) are nitrocellulose based.
Thanks again for the quick response !.. I have gone thru your excellent and comprehensive tutorial above and will bookmark for reference of course !.. I only mentioned it as this particular seller said his decs won’t work with nitro ( they contain gold foil if that makes a difference?)
I take the point of light mist coats to start with, and would follow your instructions to the letter !
Would one can each of clear and tint do for a bass maple neck you think ?
Sounds as if it’s made (like the one above) using an ALPS printer.
One can of each should be plenty
Perfect !.. Many thanks again.
Is there any advantage in the gold foil type decals vs the “normal” type btw? The other type is cheaper easier to get, ( the posh ones are from US) but if it’s a matter of an extra few quid for a way better result it’s worth while.
If they are computer printed then you need them to have used the ALPS MicroDry printing system. This is a foil transfer process and the only way to achieve a metallic gold or silver effect.
Any waterslide that uses inkjet or laserjet printing will not have the metallic component.
I’m thinking to refinish the maple neck on my “musicman” sub ray bass ( the cheapo ones!), a previous owner has roughly sanded the logo off and it looks a mess, I’d like to smooth it all and refinish with a vintage looking tinted lac. Can I use your tinted lacquer over whatever the factory finish is ? I’m assuming it’s a satin poly type thing ?
Yes it will go over with no problems.
I’d recommend you seal any bare wood first using clear lacquer, spray the tint to the required shade then finish with more clear to build up thickness.
Hi Steve,
Thanks for sharing all of your invaluable knowledge! Do you flat sand the lacquer on headstock face before applying the decal or do you just go for it and only sand it flat once the decal is thoroughly laquered over?
Thanks!
Well if you’ve sanded the wood and applied the lacquer correctly, it should be flat.
If it isn’t then yes sand flat and spray another coat of lacquer, waterslide transfers adhere best to a smooth glossy surface.
Brilliant, thanks. I’ve been scrutinising the headstock and it certainly looks to be nice and flat and feels smooth but just wasn’t sure whether my ‘eyeballing it’ was good enough! I’ve done two of these before but it was so long ago that I can’t remember for the life of me what I did back then…
Thanks again for the advice and the quick response!
Hi Steve, Excellent Guides, would you mind sharing where you purchased decal from? Or can you recommend anywhere that sell a decent quality decal?
The guy who made it will no longer make Fender decals, amd sorry but I don’t know where you can buy one like this.
Do you know the proper procedure of putting on a c Style decal on a 1979 Stratocaster anniversary?
A proper Type-C Meyercord decal? I don’t but if anyone would like to reply with information about the “special” solvent I’d love to know.
Hi, Steve
Great work as usual!
A little question, though?
I have a bound rosewood strat neck that I need to apply finish on. I’m going for a tinted lacquer and I’m wondering wether I should apply finish on the binding as well, or mask it along with the fretboard and finish it later with clear laquer to keep it from being too yellowed?
It’s a choice. When instruments were sprayed in the 50s they used clear lacquer which yellowed, so the lacquer over the binding became yellow.
If you want you binding to stay white then yes mask it. I use 3M Fineline vinyl tape which gived a good clean edge.
Thanks steve!
Hi Steve
Thanks for the quick delivery of the vintage tint lacquer! I’ve just finished prepping the neck and have put the first couple of light coats on the back of the neck first, doing it laid flat rather than hung. How long would you suggest I need to leave the neck to dry before flipping it and doing the front face, so that I don’t mark the finish on the back? I did the back first so that I got the hang of even coverage before doing the more visible front face, by the way!!
It should be okay to flip as soon as it’s dry. This depends on conditions of course but an hour should be plenty.
Don’t spray the fretboard too wet. If you do, the lacquer pushes away from the frets and you can get a white line either side.
After using clear lacquer on the headstock is it ok to just buff it up and add guitar polish or am I better lightly sanding down with 500 grit then buffing up. I’m terrified i take too much lacquer off on sanding.? Thanks Steve.
Hi Bill, if you’ve prepared and sprayed well it shouldn’t need sanding after spraying.
Thank you so much for your invaluable advice Steve. Greatly appreciated.
HI Steve, after numerous coats over a waterslide decal on the headstock the edging is still visible (when the headstock is angled slightly to the light)…..what grit of paper should I (lightly) use over the decal to smooth the edge “invisible” before final laquer coats. Many thanks Bill
Please see above, the section titled “Yellowing the headstock face”
Hi Steve,
“When applying decals I always smear some diluted (about 25% in water) white PVA glue onto the area where it’s going to be applied.”
Does this mean you use 75% water and 25% glue while applying waterslide decal?
Yes it does
Thanks. Interestingly I did the same but it didn’t stick well and it came off even I applied overcoats. I’ll try it again.
Thanks.
Great! Thanks for the terrific support Steve.
Hi Steve
How long do you leave lacquer to dry before applying the decal?
Thanks
Dave
You can apply the transfer as soon as the lacquer is dry enough to handle.
can you post the link where you purchassed the decals ? thanks
I can’t sorry. It gets him into trouble with Fender.
“it gets him” what ? this makes no sense to me,
btw you said you used it especialy not to pretend it was a real fender
also Fender is not going to sue all the fake decals in the world..
What kind of tape do you use to cover the fretboard ?
Doesn’t Nitro laquer disolve the adhesive ob painter crepe ?
I just use painters’ masking tape. I don’t have any problems with it.
Hi Steve, do you spray the whole of the neck back or mask the bit that will touch in the pocket for the rumoured wood to wood sustain effect? Thanks Paul
I spray the whole neck including the heel.
Hello. Used your vintage tint on a maple bass neck which came out really great. Now I’m thinking about how I would approach tinting a Jazz maple neck all over that has the white pearl blocks. Any thoughts, or tips? Should I tape over the blocks and binding or lightly sand off the laquer after application? I could not find any advice via google so I’m wondering if it is even possible.
Thanks.
Just spray right over the block inlays as you would a dot. The tinted lacquer is replicating the aged lacquer of the original which would have been over the whole neck, including the block inlays.
I did just that. Thanks for the reply.
Hello Friend! Varnishing the arm of my guitar, which is in maple. I used varnish common spray timber. What drying time? Then I have to sand to polish?
Thank you!
I’ve been trying to lacquer over a decal – thin coats over a period of 3 weeks! – but I’m almost through a whole can and the edge of the decal is still visible! Is this normal? I don’t mind so much, as far as I’m concerned if it looks ok then the cost is worth it, but the nitro just doesn’t seem to be building up. Having just thought it over, I bought the laquer from MGT a couple of years ago ( yes, this project is a slow one!), is there a use-by issue? Its not the first time I’ve done decals but its the one that’s taken longest!!! Any thoughts?
Kev.
The decal has a thickness and you are spraying the same coat of lacquer over the whole of the headstock face so it will still show raised.
What you need to do is flat it as I show in the demo. See the section headed “Yellowing the headstock face”. After flatting you’ll need to sand with increasingly finer grits and then buff to a shine of course.
There is a risk flatting that you sand through the decal so take care, but with a whole can on there you should be okay.
Of course !!! Haven’t done it as much this time round. Common sense took a holiday – apologies! :)
Thank you so much. I have recently got a Squier Strat and do not like the pale maple look at all. Your advice has been brilliant and I look forward to ageing my strat neck like yours (not too yellow)
Many thanks again :)
Comment & Question:
Something I have tried very succesfully. I apply the waterslide, (water only) and let it sit overnight after dabbing flat with clean white cotton cloth. I then apply a VERY thin coat of clear nitro. Let set for several more hours. At that point, I apply vaseline, (thick) very carefully over the water slide with an infants Q-tip. I then start applying my coats of nitro. The vaseline allows the outline of the water slide to be undetectable as the outside perimeter catches up to the height of the vaseline. After another night of drying/curing, I scrape the vaseline off with a brand new razor, (comes off nicely) wet sand, apply several more coats and it’s done. The outline is nearly undetectable. I have only done this with Gibson and the, “Les Paul Model” waterslide, but I believe it would work fine regardless of brand. Gibsonnoriginally applyed the silkscreen, “after all nitro”, but most moderns are buried under nitro. When I do a headstock repair, I give customer the option.
Question: I’m trying to find the history of “Meyercord”? Would you happen to know when Meyercord became the heat transfer for the Gibson headstock? Can only find tidbits of information? I got ahold of a couple NOS transfers and WOW were they nice, clean and simple to apply for headstock repair. Thx! Jeff
thanks Steve. Very good.
I’m just doing a similar job (my first time) on a Mighty Mite Tele neck (for my son’s partcaster), to learn a bit before I move onto a birdseye Strat neck for my own new Strat build.
I’ve made a few mistakes already and had to strip off the nitro twice now and start over.
Main problems being controlling the build up of the tint because the Amber tint lacquer is too dark (I live in Switzerland and cannot buy yours. Am using some from http://www.gitarrenbastler.de in Germany) and the other bigger problem is the lacquer running away from the frets and welling up on the fingerboard, leaving a paler stripe 1 – 2mm wide alongside each fret.
With the decal, 2 key things I found
– going too thick on the first coats over ther decal causes the edges of the printed letters to curl and even dislodge (the ‘c’ in Telecaster now looks like it was cut out of an Octagon. My wife would never notice – but I do!)
– the decal carrier film swells with the solvent in the nitro, working as a plasticiser. The swollen film then takes longer to dry than the surrounding lacquer, so if you don’t leave it long enough before attacking it with abrasive paper after each re-coat, then it’ll continue to shrink back further. I think the levelled decal area has now shrunk below the surrounding lacquer, so am having to build it back up again!
I was only using 2000 or 2500 grit and eventually hit the the gold ink on the ‘F’ and ‘e’ of ‘Fender’ because I was hitting it too early after the last application.
Another TIP: I painted the inside of all holes with lacquer to help prevent water penetration / give me more time to wipe water away before it has time to soak in the wood.
Some good experience there thank you.
I only ever sand once, when I have enough lacquer on to avoid a sand-through. Sanding after each re-coat is more work and riskier.
cheers Steve..
the biggest problem i have is the lacquer flowing away from the frets and leaving a narrow line of thinner (very thin) alongside the frets. Especially noticable of course with the tinted lacquer, but even spraying that first, thinly, and then aplying clear over the top, i find the clear is redissolving the tinted and still causing it to pull away from the frets, so I still end up with a paler band along the frets.
I’ve tried tint followed by clear, clear followed by tint and then more clear,
I’ve tried no sanding and sanding (with 2000 / 2500) between coats; I’ve sanded the whole fretboard as far as I can up against the edges of the frets; i’ve cleaned with thinners and/or alcohol before re-applying; I’ve tried light first coats and waited till later to apply thicker…all with the same results – paler stripe aliongside the frets. I’ve tried filling in with a small brush using a mix of the tint + clear to reduce the intensity and controll colour build, but this is very hard to do it right on all frets.
i’ve stripped it all off with nitro thinners twice already and will probably have to do it again.
So far I’ve been applying over the factory (Urethane?) satin from Mighty Mite.
Am thinking I may need to use STRIPPER to get down to bare wood.
Everywhere else the neck has ‘taken’ the lacquers just fine. It’s only alongside the frets
Just bought a different can of nitro clear for the birdseye Strat neck. This lacquer doesn’t use traditional nitro thinners (smells a bit like paraffin!) but it does dry fairly quick (not as quick as traditional nitro, but – man, it’s glossy). I prep’d the fretboard with 1200 / 1500 grit, cleaned with alcohol & nitro thinners before applied a thinnish coat of this clear and – it pulled away from the frets again. What a pain in the butt.
Am wondering if there was oily residue on the fret tangs when they were fretted
I’ll clean this off and try painting on first over the frets and just onto the board, before a light spray coat and see what happens.
This happens to me too if I rush the job.
The answer is to seal the neck with sanding sealer (which seems to adhere better) and to spray very thin coats so that the lacquer doesn’t redissolve as you describe.
Thanks for all the useful info on the site Steve.
I want to put a waterslide on a sonic blue (poly) painted headstock but I’m worried that spraying clear over it will change the colour. Any suggestions would be appreciated.
Thanks
Pete
Clear lacquer won’t noticeably change the colour of the headstock.
Having said that, up until the mid-60s Fender did not spray over the transfers so if you have a proper “island” decal I wouldn’t do it.
On the other hand, if you have a modern computer printed waterslide (that needs cutting out) then I think that they really should be coated.
Lovely work Steve, as always. I never cease to be amazed by your knowledge and thoroughness.
“Obvious Custom Copy Pretend” made me laugh! Some great tips in this post and the Vintage Guitars link is really interesting – hadn’t seen that one before.